Ok, maybe its not quite remodeling. But I had my power tools out and was making some changes to our house while we had some down time in Manatee Hammock. There are several small and trivial things that we have to do on moving day….twice (once when we pack up and once when we unpack). But several small and trivial things add up to a bigger thing. So we tried to see if there were some quick solutions. Quick being the operative word. This trip is too short to spend too much time on home improvement.
First order of business, the kids dressers. The rig came with two built in drawers in the bunkhouse. We supplemented with two of those 3 drawer, plastic Sterelite jobbies. That’s eight drawers and three kids. Shared equally that comes out to 4 drawers for the girl and 2 drawers for each boy (that’s family math). The original idea was that these two plastic dressers could be turned sideways and fit in the gap between the two bunkhouse slides. We found out on the first attempt that was not going to work. You know that scene in the original Star Wars where Han, Leia, Luke and Chewy were in that trash compactor? Well, there was no R2D2 in our case to save our plastic drawers from getting a bit crushed. So from day 2 onward moving day meant Caden manhandled one of the drawer sets into the bathroom while Dacen heaved the other up onto his bed. They are heavy and flimsy. I figured if we could get one of the sets of drawers down to just 2 drawers it would fit in the little TV nook in the bunkhouse. So we cleared out a bunch of Brielle’s clothes and toys and shipped them home. This freed up the floor space and means one less thing to do on moving day!
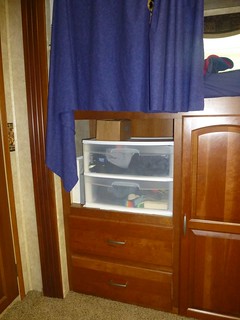
The TV nook had a little lip that prevented the bottom drawer from opening. I needed to raise up the drawers about 3/4″ but hated to buy any lumber. I remembered reading about using wheat paste to glue together layers of corrugated cardboard to create cardboard lumber. So I went to the campground recycle bins, fished out some cardboard and mixed up a hillbilly batch of wheat paste and built up some “boards” out of cardboard.
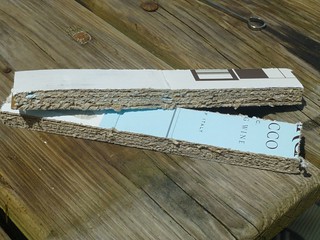
I cut these with my circular saw just like wood and created a little platform for the drawers. Its super sturdy, environmentally friendly and FREE!
I hated to throw out the unused drawer so we use it for TP and winter gear storage up on the shelf above the kids’ toilet. I screwed a couple blocks of wood to the bottom that catch on the wire shelf to prevent it from moving during transit.
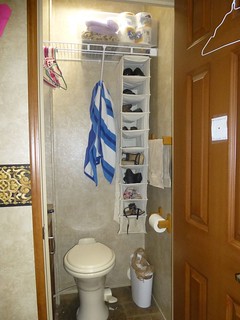
Second order of business was the shoes. I already told you about our shoe problem by the font door and my father-in-law suggested the fabric, over the door shoe holders. We had one on the bunkhouse door but there was not a door by the front door we could mount it on. The cabinet doors were tall enough but they were too narrow…about 2X too narrow. Ah ha! We’ll cut the 4 column shoe holder into two 2 column shoe holders. I bent the over the door hooks to mount one of them that way but the other I just wrapped the fabric over the top of the door and screwed it on the inside. In time we’ll see which way is better. But we are stoked to have most of the shoes off the floor. My big clod hoppers don’t fit in the teensy pockets so I still use the floor.
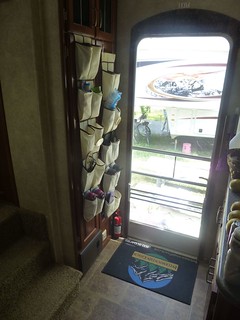
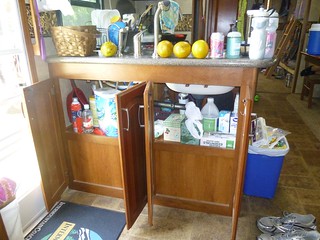
Steph had the idea of using the bottom portion of the cabinets under the kitchen sink. If the cabinet doors were only half the height we could have mounted some sort of shoe holder on those flat panel areas. But I didn’t want to monkey with modifying the cabinet doors. We thought about just taking the doors off, but then I’d have to find a place to store them and a way to protect them from getting scratched up.
Finally, I added a couple of hooks to the roof of the basement so I can hang the front bike wheels we put in there. Oh and I also rearranged all of the stuff in the basement. Its the 3rd time I’ve done it…and it might be the last. I’m pretty happy with it now. Here is the cool part though, I can completely empty my basement and then put everything back in probably 20 minutes. I wouldn’t even consider a stunt like that back home…waaaaay too much stuff.
You are so clever… You will have it all perfect by the time you get home!
You are amazing Huck! We enjoy reading how you make things work and create space for shoes and stuff. Our solution for shoes is to attach Velcro to wood just below the bed. Cutting one of those hanging shoe holders into pieces(2 pairs) and attaching to the Velcro. It certainly saves space. Safe travels.
Glenn and Melinda